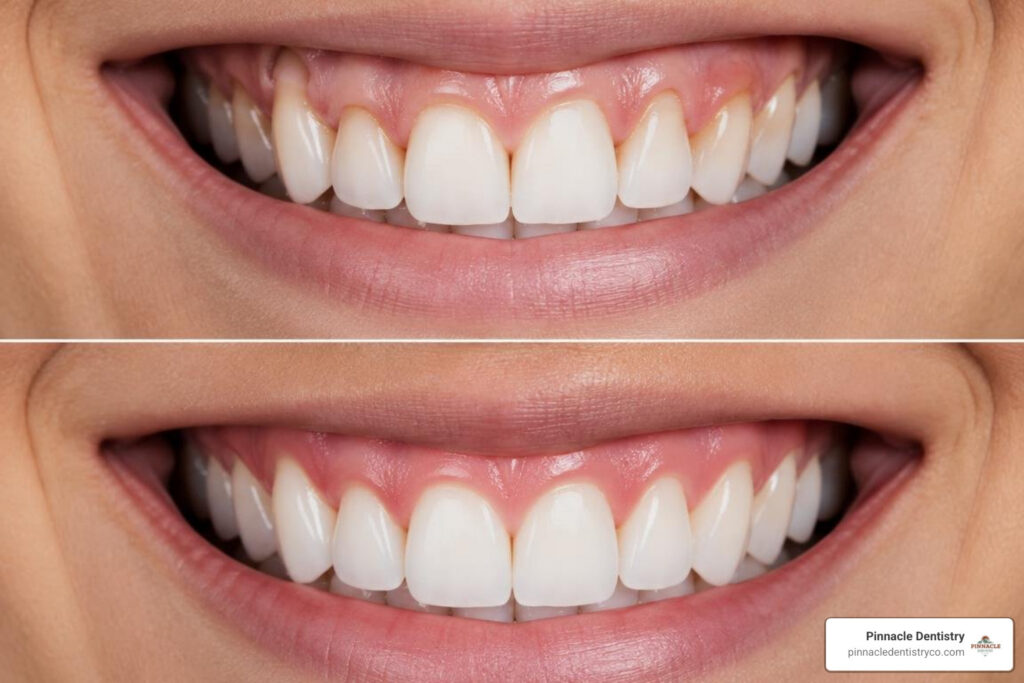

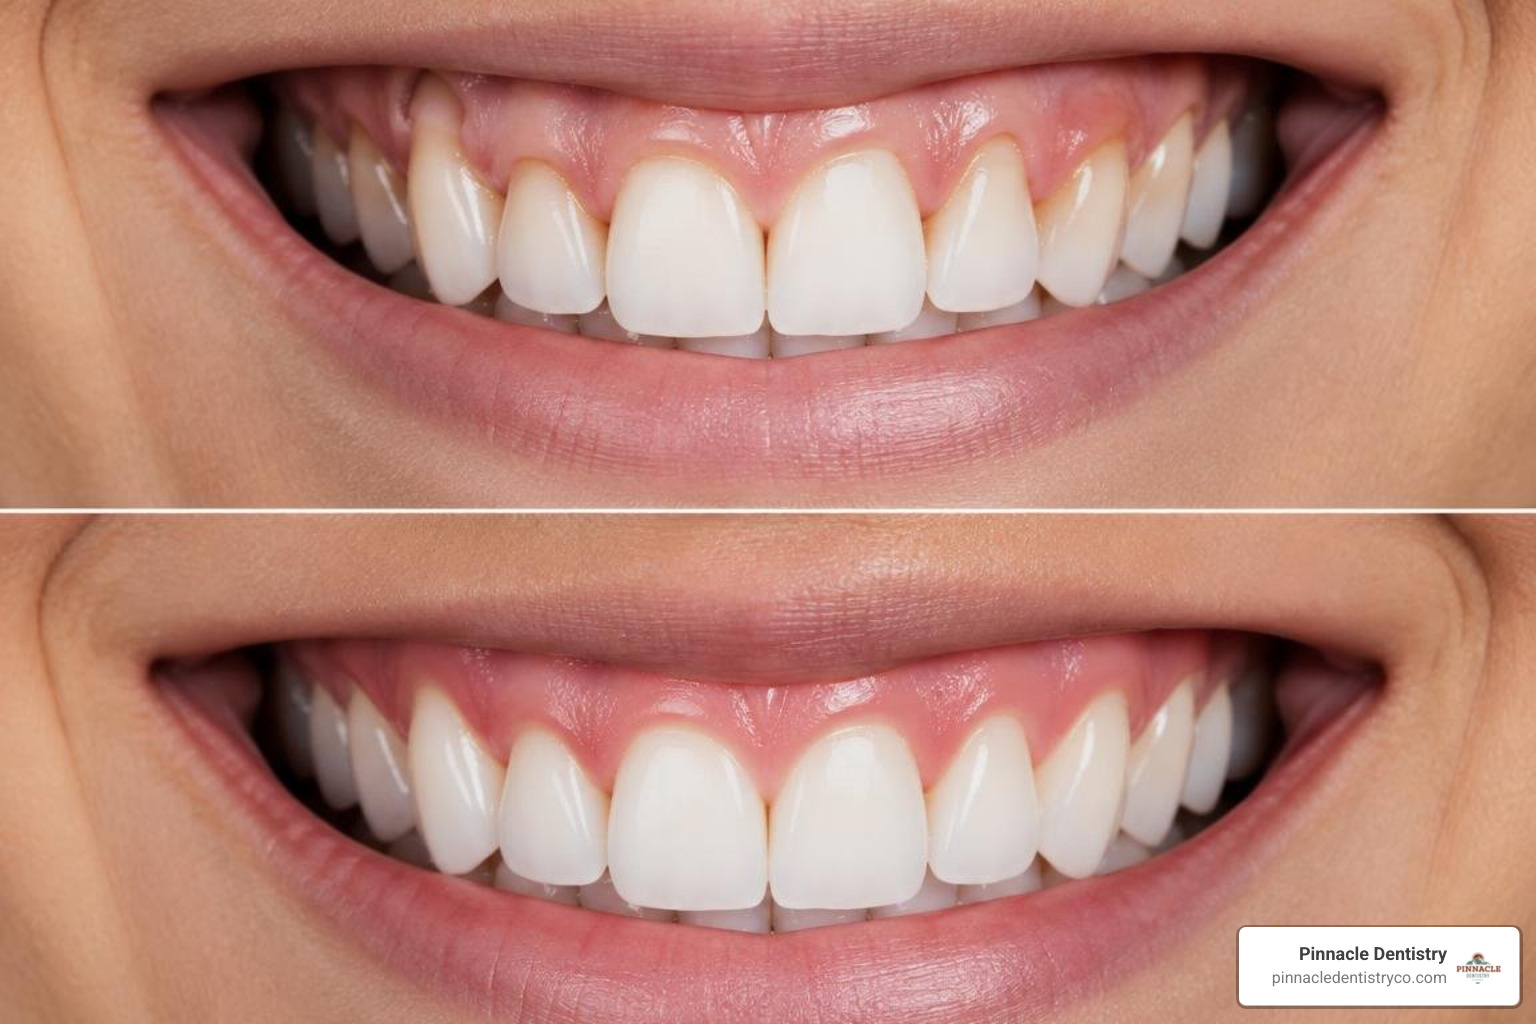
Understanding gum graft before and after results is one of the most common reasons people start researching this procedure. Here is a quick snapshot of what to expect:
At a glance: Gum graft before and after
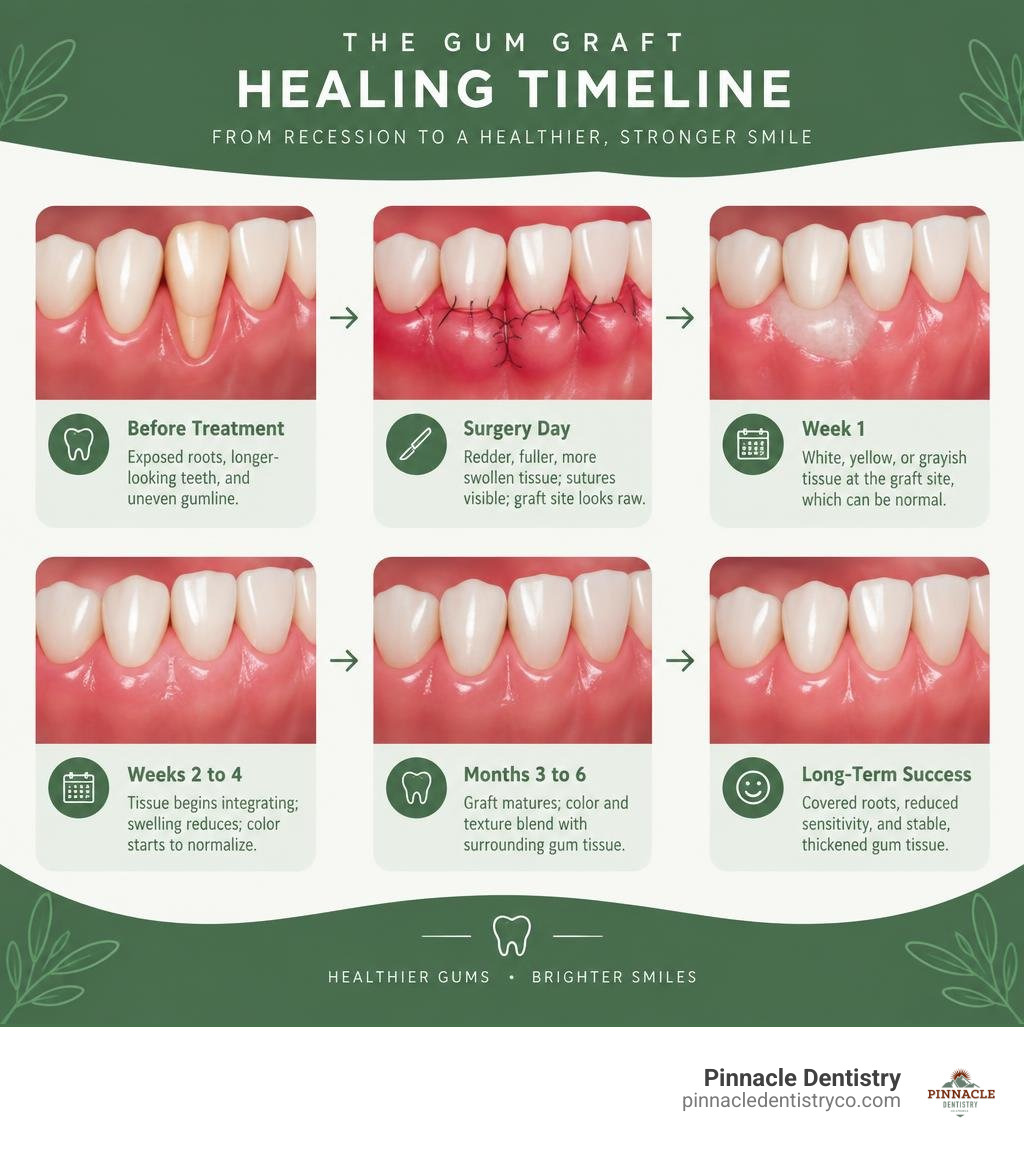
| Stage | What You See |
|---|---|
| Before treatment | Exposed roots, longer-looking teeth, gum sensitivity, uneven gumline |
| Immediately after | Redder, fuller, more swollen tissue; sutures visible; graft site looks raw |
| Week 1 | White, yellow, or grayish tissue at the graft site, which can be normal |
| Weeks 2 to 4 | Tissue begins integrating; swelling reduces; color starts to normalize |
| Months 3 to 6 | Graft matures; color and texture blend with surrounding gum tissue |
| Long-term success | Covered roots, reduced sensitivity, stable and thickened gum tissue |
Most patients want to know one thing: will the result look and feel normal? The honest answer is yes, but not right away. The immediate “after” looks nothing like the polished photos you see in online galleries. The gums are swollen, tender, and the tissue may look white or discolored at first. That is a normal part of healing.
What matters most is not just how the gums look in a final photo. A truly successful result means protected roots, reduced sensitivity, and tissue stable enough to last for years. The American Academy of Periodontology notes that gum graft surgery can cover exposed roots, help limit additional recession, and reduce tooth sensitivity. Systematic reviews also report strong average root-coverage outcomes for connective tissue grafts in appropriate cases.
The experienced dental team at Pinnacle Dentistry helps families in Colorado Springs, CO, understand each stage of gum graft care, from the first consultation through healing and long-term maintenance.
Understanding Gum Recession: The “Before” State
Before diving into the surgery itself, it helps to understand what is happening in the “before” state of your mouth. Gum recession is when the margin of gum tissue surrounding a tooth wears away or pulls back, exposing more of the tooth or its root.
For many patients in Colorado Springs, CO, the first sign of receding gums is not something they see, but something they feel. You might notice a sharp pain when drinking cold water, eating hot soup, or brushing your teeth. This sensitivity can occur because enamel does not cover tooth roots. Roots are covered by softer cementum, which can wear away and expose microscopic tubules leading toward the tooth nerve.
Visually, the “before” state often includes:
- Teeth that look unusually long or out of proportion with the rest of your smile.
- A visible notch, line, or color change near the gumline where the root meets the crown.
- Pockets or gaps forming between the teeth and gums, which can trap food and bacteria.
- Red, swollen, or inflamed gum margins that bleed easily during daily hygiene.
There are several reasons gums can recede. Aggressive brushing with hard-bristled toothbrushes can damage delicate tissue over time. Periodontal disease can destroy supporting gum tissue and bone. Orthodontic movement can also stretch and thin the gums, especially for people with naturally thin tissue. Genetics can play a role as well.
Visualizing the Gum Graft Before and After Healing Timeline
One of the biggest sources of anxiety for patients is not knowing what their mouth will look like immediately after surgery. The immediate post-operative phase can look messy, and that is normal.
To help you manage expectations, here are the visual changes that commonly occur day by day and week by week:
- Day of Surgery: The graft site may look swollen, red, and slightly bulky. If your own tissue was used, the roof of your mouth, called the palate donor site, may feel like a burn. Your dental team may provide a clear protective stent or retainer to shield this area while you eat and drink.
- Week 1 (Initial Healing): The graft site can turn white, yellow, or grayish. This discoloration is often part of normal healing as the outer tissue layer changes while deeper tissue establishes a new blood supply.
- Weeks 2 to 4 (Tissue Integration): Swelling usually decreases, and the tissue may begin to look pinker. Sutures may dissolve or be removed during a follow-up visit. The tissue starts integrating with the existing gums.
- Months 1 to 3 (Maturation): The tissue continues to contour, thin out, and blend in. It may still look slightly thicker or have a different texture than the surrounding gums.
- Months 3 to 6 (Final Results): Graft tissue commonly reaches a more mature appearance during this window, with color, texture, and thickness blending more closely with the rest of the smile.
Ongoing periodontal care gives your dental team a chance to monitor healing and help protect the delicate grafted tissue.
If gum disease contributed to the recession, treatment planning may also include gum disease treatment to address the underlying inflammation before it threatens the new gumline.
Types of Grafts and Their Expected Outcomes
Not all gum grafts are created equal. The technique your dentist or periodontist recommends can influence your recovery experience and final cosmetic result.
The main options include autogenous grafts, which use your own tissue, and donor tissue options:
- Connective Tissue Graft: This technique is often used for covering exposed roots. A small wedge of tissue is taken from under a flap on the roof of the mouth, while the outer palate layer remains intact. This can offer a favorable color match and predictable root coverage.
- Free Gingival Graft: A small piece of tissue is taken directly from the outer palate layer. It is often used to thicken naturally thin gums and help prevent future recession rather than to maximize root coverage. Because the palate wound is left open to heal, recovery can be more uncomfortable, and the final tissue may remain slightly lighter or thicker than the surrounding gums.
- Pedicle Graft: This technique may be possible when thick, healthy gum tissue is available next to the recession site. The dentist moves an adjacent flap over the exposed root and secures it with sutures. Because the tissue maintains its blood supply, healing can be rapid and the color match can be excellent.
- Donor Tissue (Allografts and Xenografts): Medically processed donor tissue can avoid a second surgical site on the palate. This option may reduce post-operative discomfort and can be useful when treating multiple teeth.
No matter which method is chosen, the goal of a gingival graft is to restore a thicker, more resilient band of protective tissue around the teeth.
Analyzing the Gum Graft Before and After Results by Graft Type
When comparing autogenous grafts with donor tissue grafts, cosmetic and functional outcomes can vary. Autogenous grafts, especially connective tissue grafts, can provide a natural color match because the tissue comes from the patient. They can also offer highly predictable root coverage in suitable cases.
Donor tissue grafts can help cover larger, multi-tooth areas without creating a palate donor site. The initial healing phase may take longer as the tissue integrates and blends with the natural gum color, but long-term outcomes can be stable and attractive.
Defining Success in Periodontal Reconstruction
What does a successful gum graft actually look like? Many patients assume that success means 100% root coverage, meaning every millimeter of the exposed root is hidden. While complete coverage is always our primary goal, it is not the only metric of success.
According to clinical guidelines on gum graft before and after results, success is measured by:
- Increased Tissue Thickness: Creating a thick, tough band of keratinized tissue that can withstand the daily friction of eating and brushing.
- Sensitivity Reduction: Completely sealing off the exposed dentin tubules to eliminate pain from hot, cold, or sweet foods.
- Long-Term Stability: Halting the progression of gum recession so that your teeth remain firmly anchored in place.
It is also important to address the anatomical limits of your mouth. If you have already suffered significant bone loss between your teeth, the gum tissue in those areas may shrink slightly after surgery, creating small spaces known as “black triangles.” This is not a surgical failure. The gum tissue relies entirely on the underlying bone for support, if the bone is gone, the gum tissue cannot magically float in mid-air to fill that gap.
What Real Gum Graft Before and After Success Looks Like
A truly successful outcome is a perfect balance of functional stability and aesthetic harmony. When the healing process is complete, your gums should feel comfortable, look natural, and provide a tight, protective seal around your teeth. For our patients in Colorado Springs, CO, the ultimate success is being able to smile confidently and enjoy a cold glass of water without a single flinch of pain.
Long-Term Maintenance and Protecting Your Results
Once your graft has fully matured, often around the six-month mark, you enter the protection phase. A gum graft is an effective treatment, but it does not eliminate the habits or conditions that caused recession in the first place.
To protect your results, use an extra-soft toothbrush with a gentle sweeping motion, wear a custom nightguard if you clench or grind your teeth, and keep your recommended professional cleanings.
For a deeper look at everyday prevention, our guide to maintaining healthy gums explains practical habits that can reduce irritation around the gumline.
Patients with a history of periodontal disease can also learn why consistent monitoring matters in our article on preventing periodontal disease. Addressing inflammation early supports the stability of both natural and grafted gum tissue.
Frequently Asked Questions About Gum Grafting
How long does it take for a gum graft to look normal?
Most gum grafts begin to look remarkably natural within two to four weeks as the new blood supply fully establishes. However, the tissue will continue to settle, thin out, and blend in color for three to six months before reaching its final, fully matured appearance.
What does a gum graft look like after one week of healing?
At one week, the graft site often looks quite unusual. It is common to see white, yellowish, or grayish tissue sloughing off the surface. This is a normal part of the healing process, representing the superficial layers of tissue shedding while the deeper layers integrate.
Does a gum graft completely cover exposed tooth roots?
In many cases, yes. However, complete root coverage depends heavily on the severity of your recession and the height of the bone between your teeth. If you have intact bone, complete coverage is highly predictable. If bone loss is present, we aim for maximum possible coverage and tissue thickening.
Is gum graft surgery painful during the recovery period?
The procedure itself is entirely painless due to local anesthesia. Afterward, discomfort is typically mild to moderate. If we harvest tissue from your palate, it may feel like a moderate burn for a few days. Using donor tissue completely eliminates this source of discomfort.
Can gum recession return after a successful graft?
Yes, if the underlying causes are not corrected. Aggressive brushing, teeth grinding, untreated gum disease, or poor oral hygiene can cause even grafted tissue to recede over time. Following our long-term maintenance tips is the best way to prevent a relapse.
What are the primary symptoms of a failed gum graft?
The most obvious sign of graft failure is a large patch of white or gray tissue completely peeling away from the tooth, accompanied by a total loss of volume in the area. Other signs include pus, severe throbbing pain that worsens after a week, or a fever over 101 degrees Fahrenheit.
Can a gum graft use donor tissue instead of my palate?
Absolutely. We frequently use medically processed human donor tissue (allografts) or animal-derived tissue (xenografts). This is a highly successful alternative that eliminates the need for a second surgical site on the roof of your mouth, making your recovery much more comfortable.
How does smoking affect gum graft before and after results?
Smoking significantly restricts blood flow to your delicate gum tissues, which drastically delays healing and increases the risk of graft failure. We strongly advise patients to stop smoking for several weeks before and after surgery to protect their results.
When can I resume normal eating and brushing after surgery?
You should stick to a soft, cool food diet (such as yogurt, eggs, and smoothies) for the first week. Do not brush or floss directly on the graft site until we clear you to do so, typically around the two-week mark. Sutures are usually removed or dissolve within ten to twenty-one days.
Why is there a black triangle between my teeth after a gum graft?
Black triangles are caused by pre-existing bone loss between the teeth. Because gum tissue relies on the underlying bone for physical support, the graft cannot fill spaces where the bone has already resorbed. The graft will, however, protect the roots and stabilize the remaining tissue.
Conclusion
Undergoing a gum graft can be a proactive step to protect your smile, reduce sensitivity, and limit the risk of future tooth loss. While the initial healing phase requires patience and careful home care, the long-term benefits can be meaningful.
At Pinnacle Dentistry, our team provides personalized gum-health guidance for patients in Colorado Springs, CO, with a focus on clear expectations, careful follow-up, and comfortable care.
If you are noticing signs of gum recession or want to discuss your treatment options, contact our gum graft specialists at Pinnacle Dentistry to schedule a personalized consultation at our Research Parkway office.